This blog is intended solely for educational purposes. Please refrain from using this information for malicious purposes.
Introduction
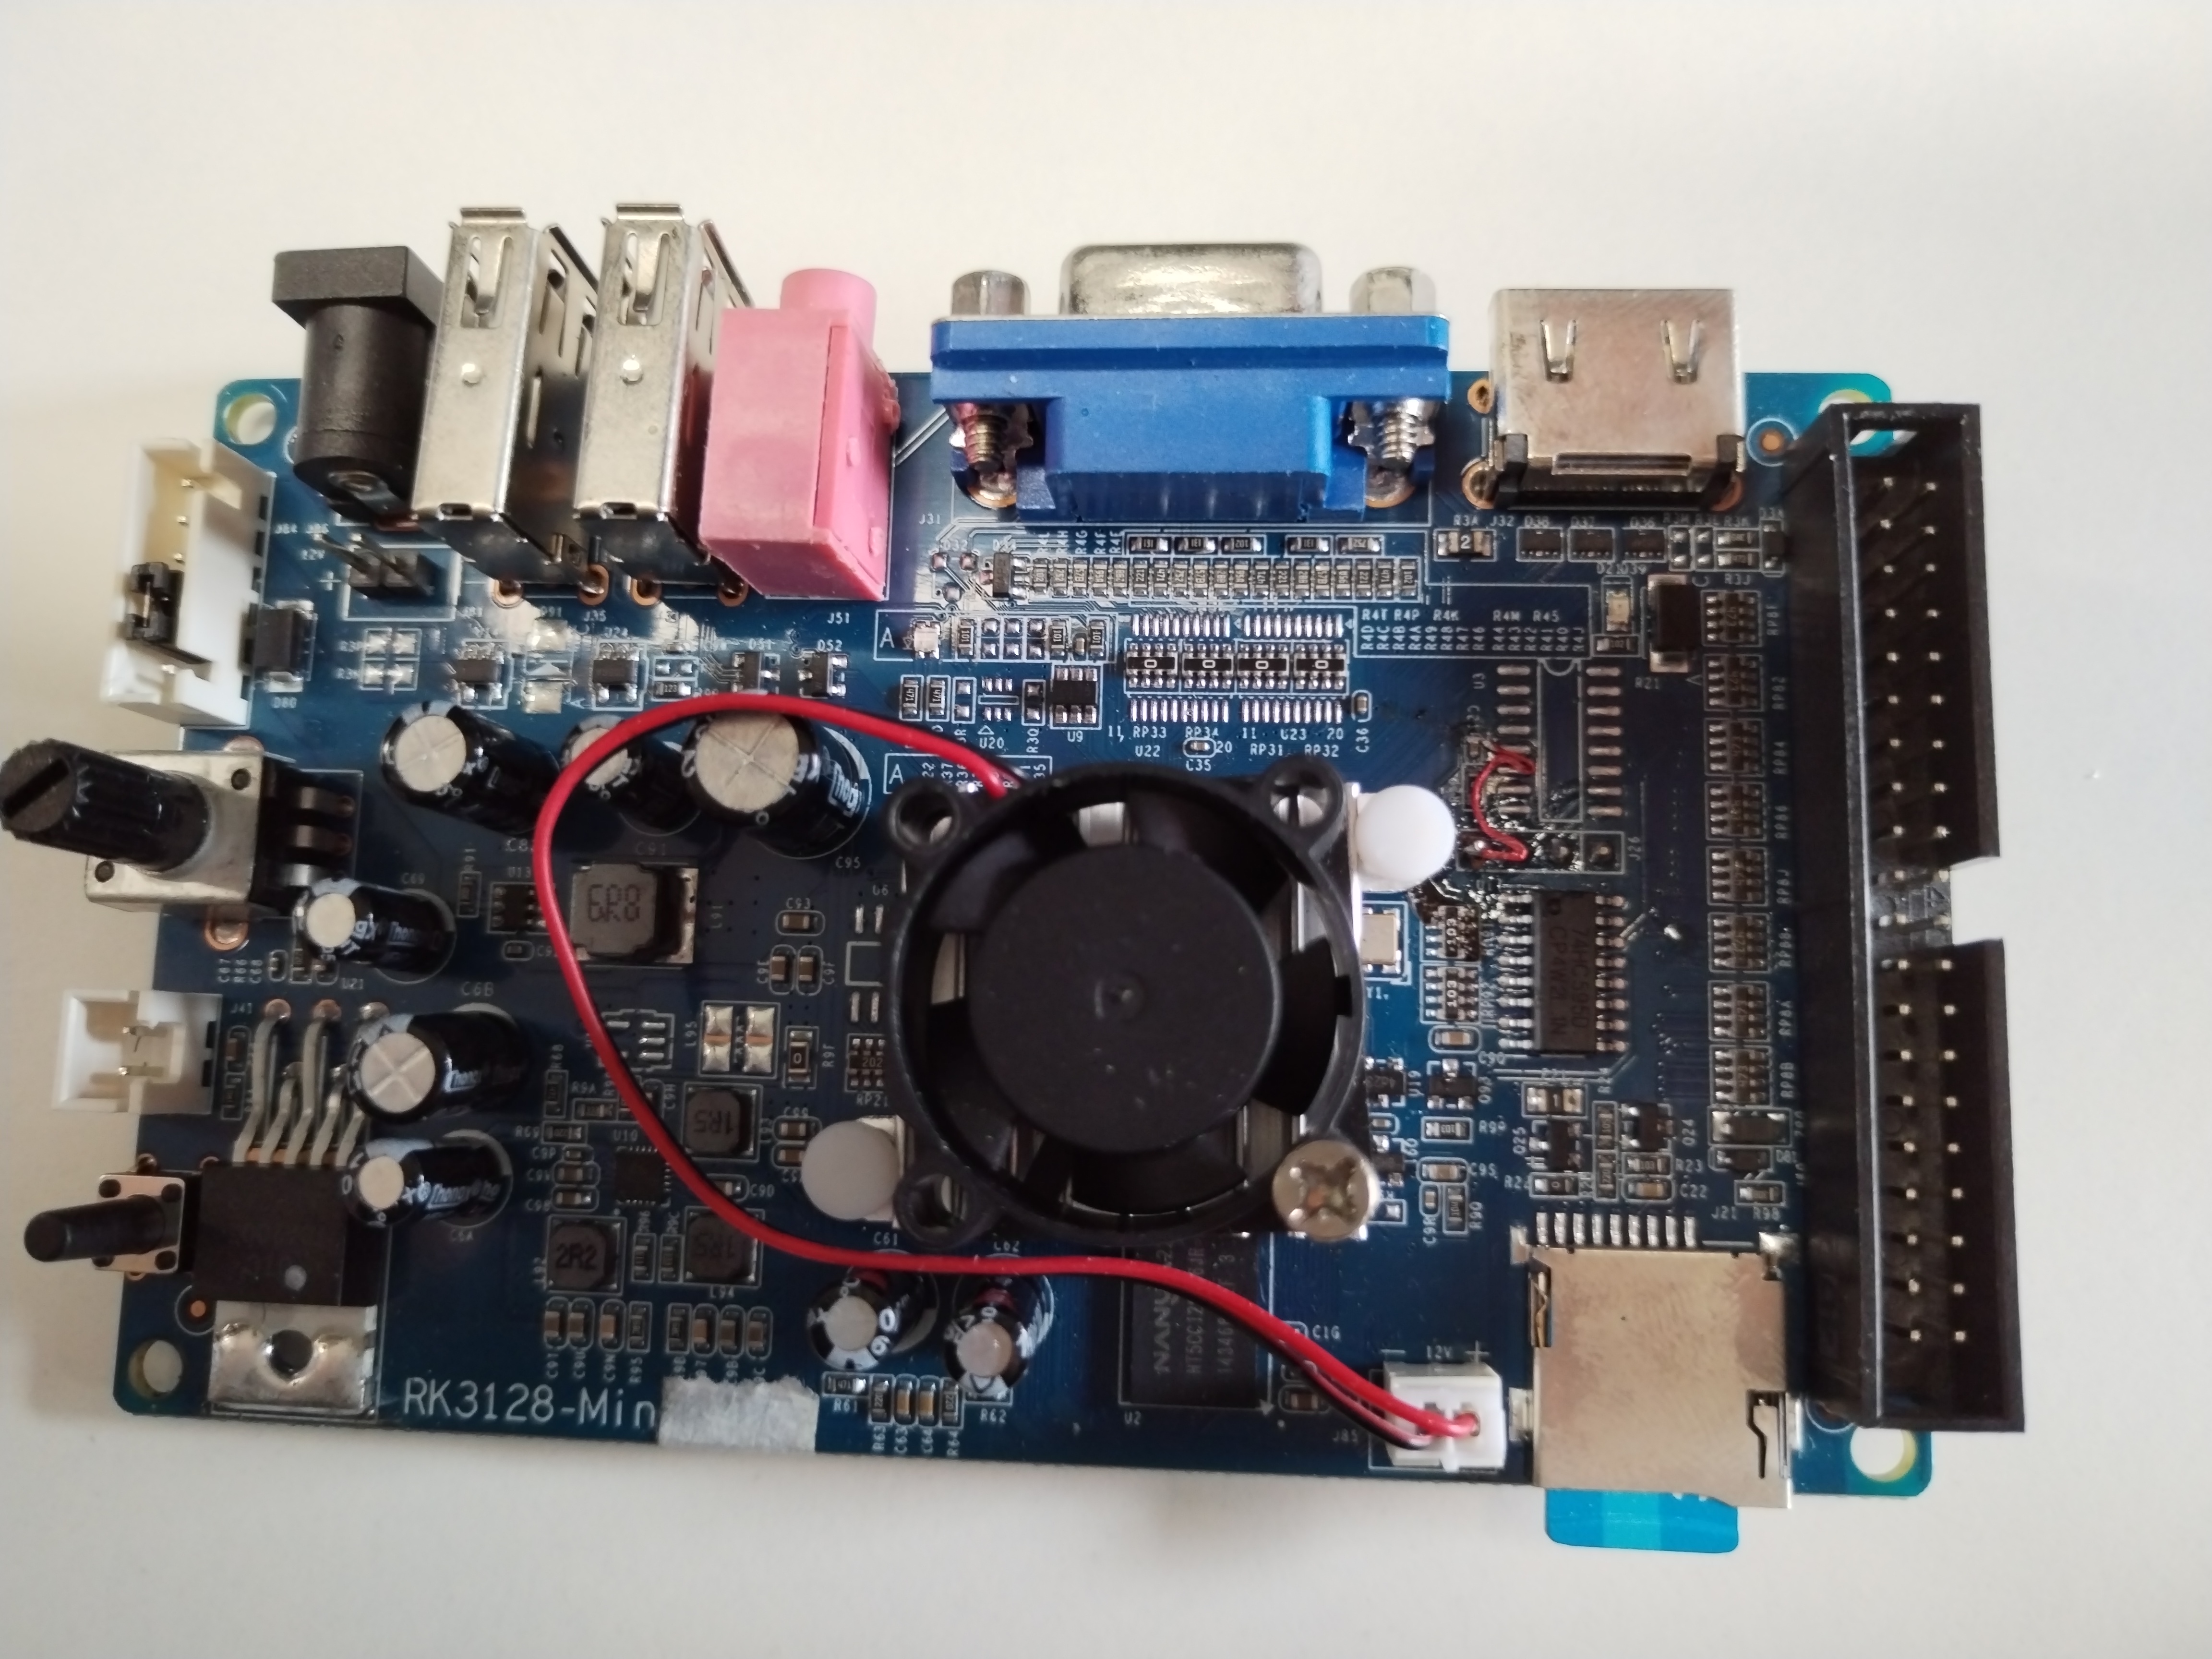
I recently acquired a new Pandora’s Box game cartridge, which utilizes the RK3128 system-on-a-chip (SOC) from Rockchip. I wanted to share my experience with hacking it. The manufacturer has overclocked it to 1.5GHz to ensure smooth gameplay with HD video filtering. However, due to the increased performance, an additional fan is required for cooling. Fortunately, the cartridge uses an SD card for booting, making it easy to dump the firmware.Here is a photo of the PCB:
loader
The system initiates the “loader” program to extract necessary files and launch the main program, “mkemu.” The manufacturer has placed the “loader” in the initram filesystem of the kernel, which is in CPIO format. Extracting the “loader” binary is a straightforward process. The following code snippet from /etc/init.d/rcS in the initram reveals how the system starts the “loader” program:
cd /lib/modules/3.4.39-h3 insmod elib.ko #insmod ch341.ko
whiletrue do /home/games/loader done
Analyzing the Loader Program
I loaded the “loader” program into Ghidra and performed an automated analysis. At address 0x11b10, it becomes evident that the “loader” attempts to mount a LUKS filesystem file:
The LUKS key is stored in ASCII format at address DAT_00028c94 and is calculated using a number read from /dev/elib. The function at 0x14720 includes the code to read the original number from /dev/elib:
Fortunately, the programmer compiled the Linux driver into an individual .ko file instead of including it in the kernel binary. This allows us to easily locate the code responsible for returning the number within the small .ko file.
Analyzing elib.ko
We can find elib.ko in the CPIO filesystem. By loading it into Ghidra, we can locate the code that handles the 0x80045a13 ioctl code in the elib_ioctl function. Ghidra’s decompiled C code provides the following information:
And the programmer is lazy, as he hardcoded this sensitive number. It’s 0x87654321. I noticed there is an MCU on the PCB, and I suspected the programmer might have stored the number in the MCU, but he didn’t.
Find the key for the LUKS file
Now, it’s time to calculate the key for the LUKS file. I decided to use unicorn engine for this task, I wrote a python script for this task. This script requires the preparation of the file rocky.rsa and the number 0x87654321. The thumb instructions call the standard libc functions, memset and memcpy. I simulate these two functions in the block_hook section. The following is the code:
If the script succeeds, we can get the LUKS key at address 0x28c94. It is a string, and we can use this key to mount the LUKS file on a PC.
Decrypt config.dat file
The function at 0x011dc8 is a decryption function. loader uses it to decrypt config.dat and other configuration files for gaming. I wrote a Python script to perform this decryption. The script saves the resulting file to /tmp/tt.bin.
mkemu
loader starts mkemu using system. We can find the related instruction at address 0x01153c in loader. The Ghidra decompiled C code is as follows:
mkemu is the essential program for this game cartridge. It displays the game selection menu and allows users to play their selected game. After analyzing it using Ghidra, I believe it utilizes SDL.
Decrypt asset
The programmer encrypted and packaged the assets in the file asset.dat. Therefore, we need to decrypt the assets using the Thumb instructions in mkemu. You can find the complete Python script in here. This script will save each decrypted asset file in the target folder.
Conclusion
This board isn’t very difficult, and I feel like hacking it is similar to participating in a Capture The Flag (CTF) competition. Every key is like a flag. The only difference is that the board is real.
This blog is only for educational purposes. Never use these info for bad.
Introduction
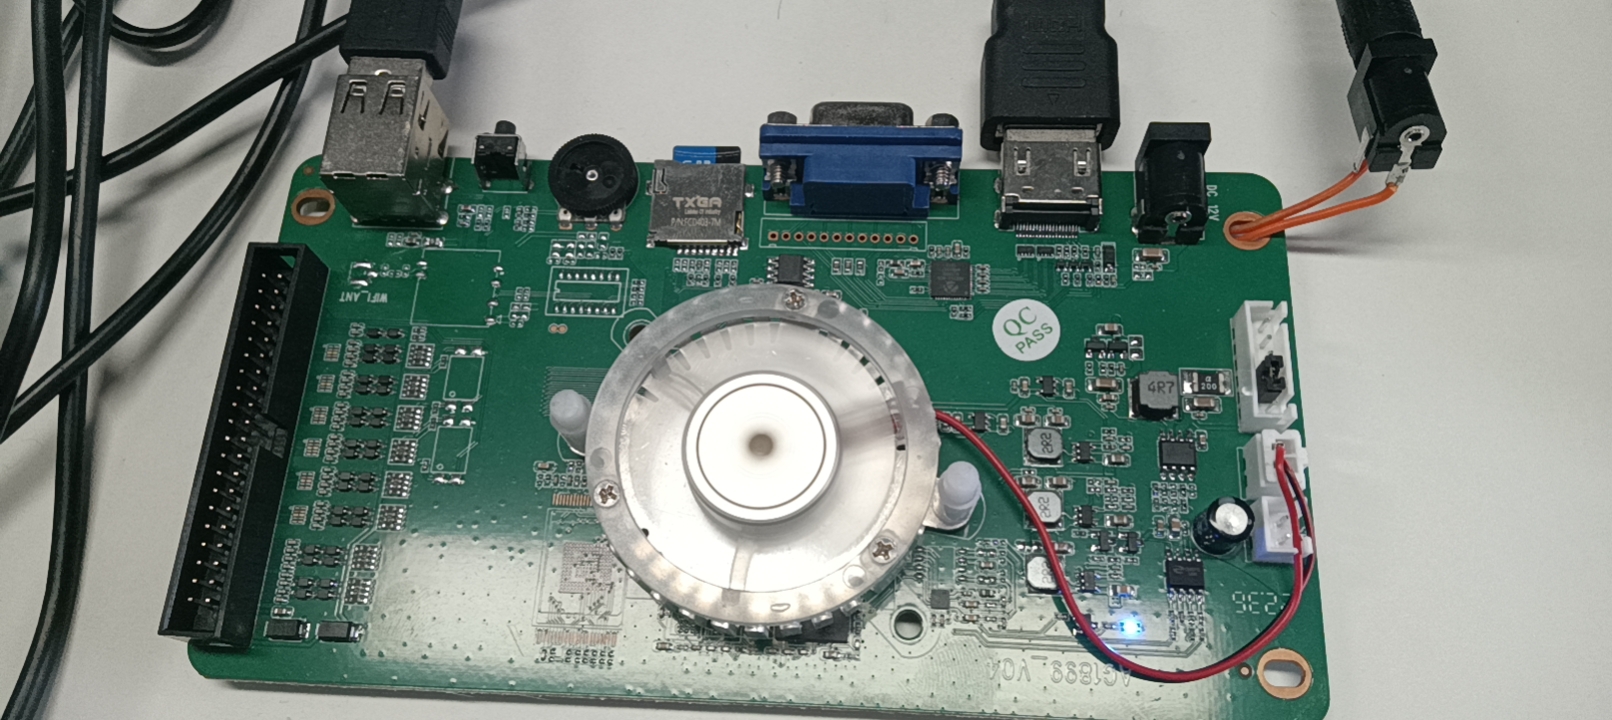
Pandora’s box multi-game cartridge is a popular product from China. This cartridge usually has 1000+ retro arcade games. It supports Jamma and HDMI. Users can enjoy old-time games with it. And some newer versions of it have more than 10,000 games, and support some home console games. Many manufactures from China have the ability to design and product Pandora’s box multi-game cartridge. They always add software protection to prevent others from cloning their efforts. Recently, I got a newer version of PB boards. And I hacked it. I will introduce the steps of how I hacked this board. The PCB is as follows: I uploaded all code to github
Tools/Packages I used
strings is a GNU util to output all printable strings in files.
binwalk is a easy way to extract firmware from an image file.
Ghidra is a great suite for disassembling and decompiling binary from variety platforms.
Unicorn is a lightweight multi-platform, multi-architecture CPU emulator framework.
Inspect image
This board uses Amlogic s805. This SOC is old, and not very powerful for running some 3D games. I think the manufaturer selected this SOC only beacause it’s cheap. This SOC only cost near to $1 if they select to use second-hard ICs. This board has s805, a memory IC, and no EMMC IC. It has a TF card of size 32GB, this board uses TF card boot mode. The TF card has 2 partitions, shown as the following:
UCL data compression library (v1.03, Jul 20 2004). Copyright (C) 1996-2004 Markus Franz Xaver Johannes Oberhumer http://www.oberhumer.com/opensource/ucl/
uclpack: block-size is 262144 bytes uclpack: decompressed 340268 into 740288 bytes
$ file uboot.bin.decompressed uboot.bin.decompressed: data
file can not recognize U-boot type. But strings can still give us some useful info.
1 2 3 4 5 6 7 8
$ strings -tx uboot.bin.decompressed <...> a9b72 switch_bootmode=iftest${reboot_mode} = factory_reset; then run recovery;elseiftest${reboot_mode} = update; then run update; elseiftest${reboot_mode} = usb_burning; then run usb_burning;elseiftest${wipe_data} = failed; thenecho wipe_data=${wipe_data}; run recovery;elsefi;fi;fi;fi a9c98 prepare=logo size ${outputmode}; video open; video clear; video dev open ${outputmode};if fatload mmc 0 0x13000000 logicalcircuit; then bmp display 0x13000000; bmp scale;fi; a9d46 storeboot=echo Rx Booting...; if unifykey get usid; then setenv bootargs ${bootargs} androidboot.serialno=${usid};fi;echo [Maple] read info...; if mmcinfo; thenif fatload mmc 0 ${loadaddr} rxnv; then setenv bootargs ${bootargs} bootfromsd; bootm;fi;fi; echo failed...; run recovery a9e62 recovery=echo enter recovery;if mmcinfo; thenif fatload mmc 0 ${loadaddr} recovery.img; then bootm;fi;fi; if usb start 0; thenif fatload usb 0 ${loadaddr} recovery.img; then bootm; fi;fi;if imgread kernel recovery ${loadaddr}; then bootm; elseecho no recovery in flash; fi; a9f77 usb_burning=update 1000 <...>
At 0xa9d46, storeboot environment variable shows U-boot load rxnv file using fatload command, and runs it using bootm. Now I can be sure rxnv actually is the kernel, and it should be encrypted. fatload should have code to decrypt it, or the kernel will not boot.
Locate decrypt codes in U-boot
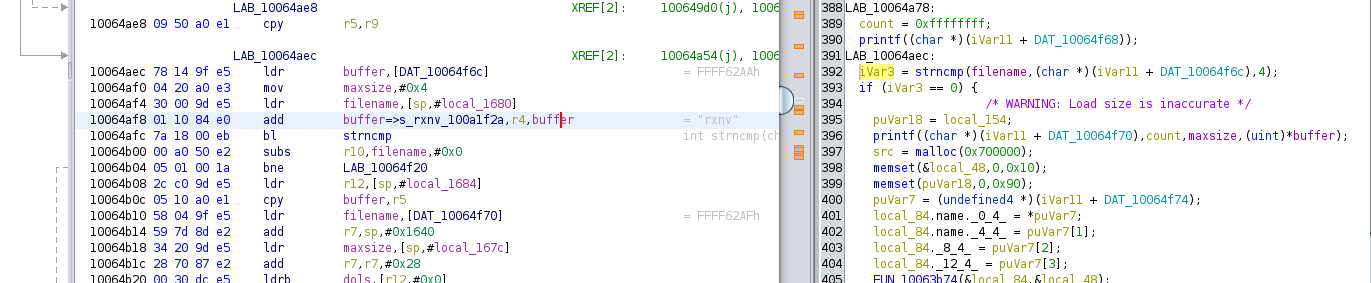
Now, open uboot.bin.decompressed with Ghidra. I can get U-boot will be loaded at 0x10000000 by check file build/u-boot.map in U-boot source code. That’s the funnest part during the whole hacking. Inspect disassemble code with source code. To make analysis easier, I wrote a header file uboot.h. This file includes some structure definitions. We can import this file into ghidra.After hours of efforts, I found the codes to decrpyt rxnv, it’s at 0x10064aec-0x10064f2c, shown as follows: . And these codes mainly do the following things:
Check the name of the file currently loading, if it is rxnv then decrytpt;
It seems to prepare key in the first loop;
Decrypt data in the sencode loop; And I found ghidra’s register renaming makes it not very easy to know the actual register name in every assembly instruction, just like instruction mov maxsize, #0x4 at 0x10064af0. We can use Patch Instruction menu item in the context menu to check the original instructions.
Decrypt data using code in U-boot
Let’s decrypt rxnv using the code we found. I worte a python script for this work. This python script uses unicorn to emulate ARM instructions in U-boot to decrypt rxnv file.
Create an ARM emulator
1
mu = Uc(UC_ARCH_ARM, UC_MODE_ARM)
Allocate memory
1 2 3 4 5 6 7 8
mu.mem_map(code_ptr, 0x10000000); # code_ptr= 0x10000000, I will put U-boot binary in here
mu.mem_map(data_ptr, 0x10000000); # data_ptr= 0x20000000, I will put encrypted data in here;
mu.mem_map(alloc_ptr, 0x10000000); # alloc_ptr= 0x30000000, this rangion if for malloc/free functions
mu.mem_map(0 , 0x00200000); # this is stack, and set sp_ptr = 0x00100000
Load data
1 2 3 4 5 6
# load uboot mu.mem_write(code_ptr, open('uboot.bin','rb').read()) # load data data = open('rxnv','rb').read(); datalen = len(data); mu.mem_write(data_ptr, data);
# callback for tracing basic blocks defhook_block(uc, address, size, user_data): if address == 0x10016248: # hook malloc, emulate malloc function, sz = uc.reg_read(UC_ARM_REG_R0); global alloc_ptr; ret = alloc_ptr; alloc_ptr+=sz; uc.reg_write(UC_ARM_REG_R0, ret); # write return value, a pointer to allocated memory uc.reg_write(UC_ARM_REG_PC, uc.reg_read(UC_ARM_REG_LR)); elif address == 0x10015fec: # hook free, do nothing uc.reg_write(UC_ARM_REG_PC, uc.reg_read(UC_ARM_REG_LR)); elif address == 0x10015bc8: # hook printf , actual printf function will access to serial port, so I emulate this function to avoid hardware operations. Unicorn is a great tool to emulate CPU, but is not very easy to implement serial ports. fmt = uc.reg_read(UC_ARM_REG_R0); bs = uc.mem_read(fmt, 0x100); s = bs.decode('utf-8').split('\0')[0]; print(s) # only print the first arguments uc.reg_write(UC_ARM_REG_PC, uc.reg_read(UC_ARM_REG_LR)); elif address == 0x10064d14: # This is at the begin of the second loop, print loop variable and total loop counter to show decrypt progress n1=struct.unpack('I', uc.mem_read(uc.reg_read(UC_ARM_REG_SP)+0x18,4))[0] n2=struct.unpack('I', uc.mem_read(uc.reg_read(UC_ARM_REG_SP)+0x28,4))[0] print('go here', n1, n2); # tracing all basic blocks with customized callback mu.hook_add(UC_HOOK_BLOCK, hook_block)
Initialize registers and variables in the stack.
1 2 3 4 5 6 7
mu.reg_write(UC_ARM_REG_R5,     datalen ) # datalen is length of the encrpyted data
mu.reg_write(UC_ARM_REG_R4,     0x100abc80) # d = 0x100641d4+[0x10064f48]
mu.reg_write(UC_ARM_REG_R0,     0       ) #
mu.reg_write(UC_ARM_REG_SP,     sp_ptr  ) # set stack register
# set maxsize
mu.mem_write(sp_ptr+0x34, struct.pack('I', 0x800000)); # this variable should be greater than datalen;
mu.mem_write(sp_ptr+0x2c, struct.pack('I', data_ptr)); # data_ptr is the pointer to encrypted data;
open('rxnv.decrypted','wb').write(mu.mem_read(data_ptr, datalen)) # now, data_ptr points to the decrypted data
Please note: this script may take a long time to run. I tested it with my PC,(Intel(R) Core(TM) i5-9400 CPU @ 2.90GHz , 6 cores, 16GB DDR), and it took 15 minutes, so I printf loop variable at 0x10064d14. Now, we check decrypted rxnv.
Run the same commands to mount rxte and user file, we can get actual rootfs.
1 2 3 4
sudo cryptsetup luksOpen rxte rxsys -d _rxnv.decrypted.extracted/cpio.files/usr/lib/system.key
sudo cryptsetup luksOpen user user -d _rxnv.decrypted.extracted/cpio.files/usr/lib/system.key
sudo mount /dev/mapper/rxsys /mnt/disk -o "rw,loop"
sudo mount /dev/mapper/user /mnt/disk1 -o "rw,loop"
Now we have hacked this board.
Conclusion
Finally, I hacked this board, The primary part is to decrypt rxnv using unicorn. We need not to rewrite instructions in C or Python. All we need to do is emulate the ARM instructions correctly.
 .
.