Hacking pandroa's box game cartridge 1
Disclaimer
This blog is only for educational purposes. Never use these info for bad.
Introduction
Pandora’s box multi-game cartridge is a popular product from China. This cartridge usually has 1000+ retro arcade games. It supports Jamma and HDMI. Users can enjoy old-time games with it. And some newer versions of it have more than 10,000 games, and support some home console games. Many manufactures from China have the ability to design and product Pandora’s box multi-game cartridge. They always add software protection to prevent others from cloning their efforts.
Recently, I got a newer version of PB boards. And I hacked it. I will introduce the steps of how I hacked this board.
The PCB is as follows: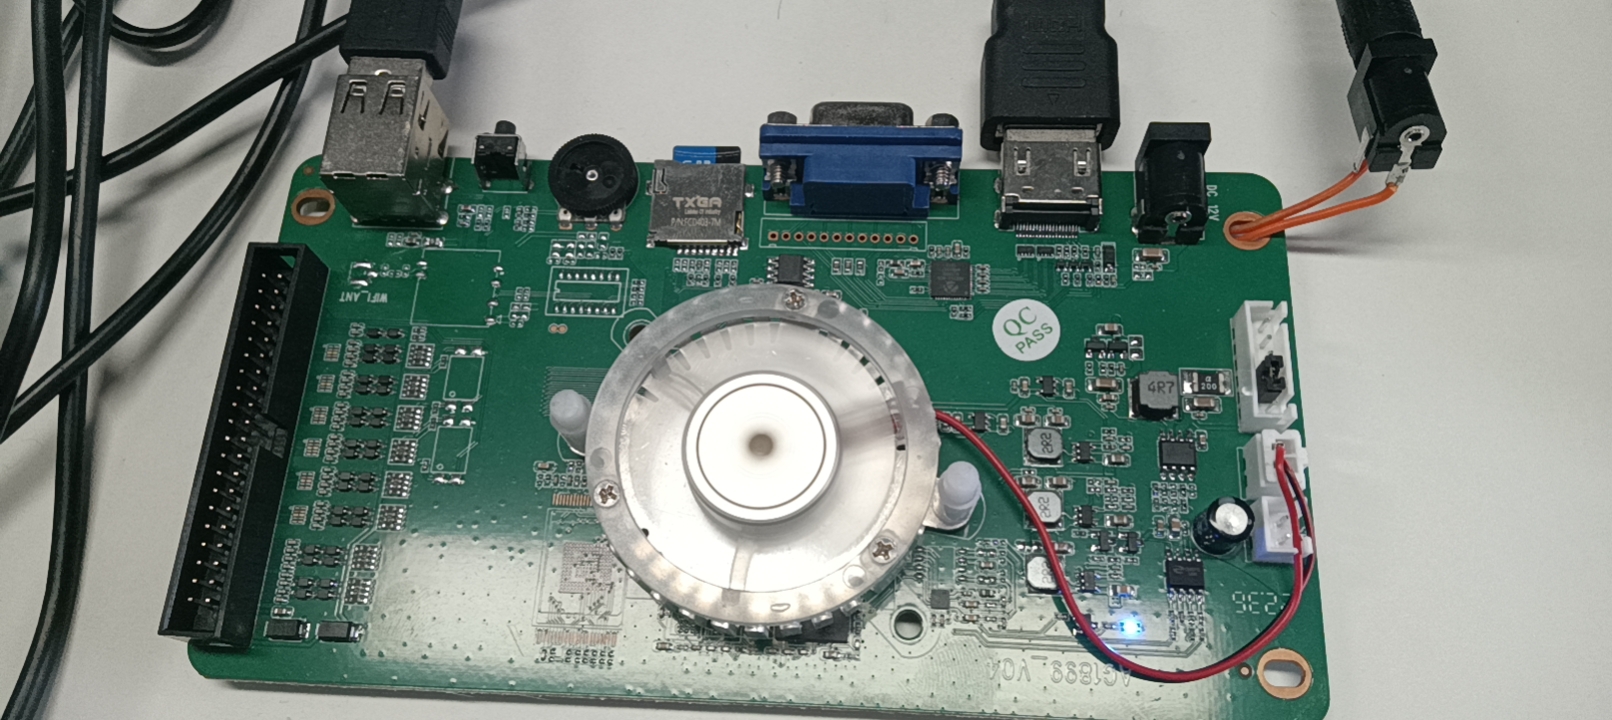
I uploaded all code to github
Tools/Packages I used
- strings is a GNU util to output all printable strings in files.
- file is a GNU util to determine files type.
- binwalk is a easy way to extract firmware from an image file.
- Ghidra is a great suite for disassembling and decompiling binary from variety platforms.
- Unicorn is a lightweight multi-platform, multi-architecture CPU emulator framework.
Inspect image
This board uses Amlogic s805. This SOC is old, and not very powerful for running some 3D games. I think the manufaturer selected this SOC only beacause it’s cheap. This SOC only cost near to $1 if they select to use second-hard ICs.
This board has s805, a memory IC, and no EMMC IC. It has a TF card of size 32GB, this board uses TF card boot mode.
The TF card has 2 partitions, shown as the following:
1 | $ fdisk -l pb1.img |
I mounted partition 1 to check its files:
1 | $ sudo mount -oloop,ro,offset=$((8192*512)) pb1.img /mnt/disk |
And checked the file type using file
1 | $ file /mnt/disk/* |
It shows file rxnv maybe encrypted.
I uploaded the TF card image file here. And I striped partition 2 to save room.
Analyse U-boot
U-boot has many versions. We should find U-boot in s805 SDK. I find Odroid C1 is using s805. And I can find partitions table here.
Download related U-boot source code
As this page shows, we can download U-boot source from github
1 | $ git clone https://github.com/hardkernel/u-boot.git -b odroidc-v2011.03 |
Extract U-boot binary
We can extract U-boot from the image accord to partitions table
1 | $ dd if=pb1.img skip=64 count=$((8192-64)) of=uboot.bin |
If we compile U-boot successfully, we can get a tool build/tools/uclpack to decompress UCL data. I guess UCL is the special package format for s805.
1 | $ build/tools/uclpack -d uboot.bin uboot.bin.decompressed |
file can not recognize U-boot type. But strings can still give us some useful info.
1 | $ strings -tx uboot.bin.decompressed |
At 0xa9d46, storeboot environment variable shows U-boot load rxnv file using fatload command, and runs it using bootm. Now I can be sure rxnv actually is the kernel, and it should be encrypted. fatload should have code to decrypt it, or the kernel will not boot.
Locate decrypt codes in U-boot
Now, open uboot.bin.decompressed with Ghidra. I can get U-boot will be loaded at 0x10000000 by check file build/u-boot.map in U-boot source code.
That’s the funnest part during the whole hacking. Inspect disassemble code with source code. To make analysis easier, I wrote a header file uboot.h. This file includes some structure definitions. We can import this file into ghidra.After hours of efforts, I found the codes to decrpyt rxnv, it’s at 0x10064aec-0x10064f2c, shown as follows: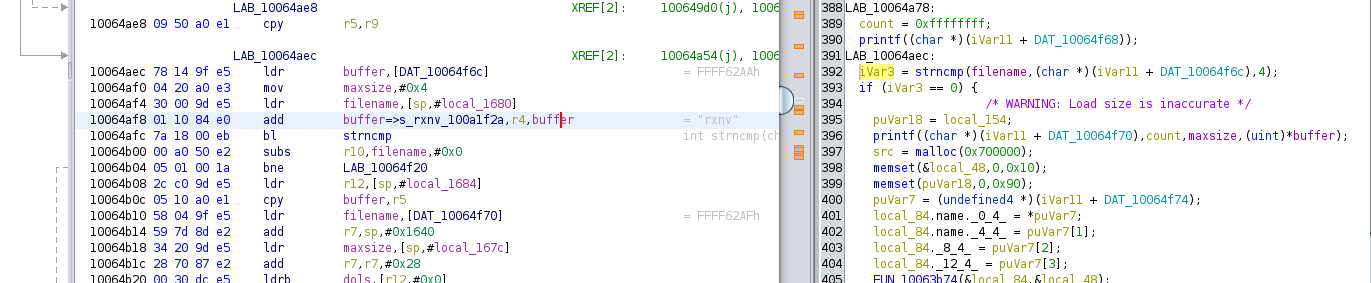 .
.
And these codes mainly do the following things:
- Check the name of the file currently loading, if it is
rxnvthen decrytpt; - It seems to prepare key in the first loop;
- Decrypt data in the sencode loop;
And I found ghidra’s register renaming makes it not very easy to know the actual register name in every assembly instruction, just like instructionmov maxsize, #0x4at 0x10064af0. We can usePatch Instructionmenu item in the context menu to check the original instructions.
Decrypt data using code in U-boot
Let’s decrypt rxnv using the code we found. I worte a python script for this work. This python script uses unicorn to emulate ARM instructions in U-boot to decrypt rxnv file.
- Create an ARM emulator
1
mu = Uc(UC_ARCH_ARM, UC_MODE_ARM)
- Allocate memory
1
2
3
4
5
6
7
8mu.mem_map(code_ptr, 0x10000000); # code_ptr= 0x10000000, I will put U-boot binary in here
mu.mem_map(data_ptr, 0x10000000); # data_ptr= 0x20000000, I will put encrypted data in here;
mu.mem_map(alloc_ptr, 0x10000000); # alloc_ptr= 0x30000000, this rangion if for malloc/free functions
mu.mem_map(0 , 0x00200000); # this is stack, and set sp_ptr = 0x00100000 - Load data
1
2
3
4
5
6# load uboot
mu.mem_write(code_ptr, open('uboot.bin','rb').read())
# load data
data = open('rxnv','rb').read();
datalen = len(data);
mu.mem_write(data_ptr, data); - Write hook codes
1
2
3
4
5
6
7
8
9
10
11
12
13
14
15
16
17
18
19
20
21
22
23# callback for tracing basic blocks
def hook_block(uc, address, size, user_data):
if address == 0x10016248: # hook malloc, emulate malloc function,
sz = uc.reg_read(UC_ARM_REG_R0);
global alloc_ptr;
ret = alloc_ptr;
alloc_ptr+=sz;
uc.reg_write(UC_ARM_REG_R0, ret); # write return value, a pointer to allocated memory
uc.reg_write(UC_ARM_REG_PC, uc.reg_read(UC_ARM_REG_LR));
elif address == 0x10015fec: # hook free, do nothing
uc.reg_write(UC_ARM_REG_PC, uc.reg_read(UC_ARM_REG_LR));
elif address == 0x10015bc8: # hook printf , actual printf function will access to serial port, so I emulate this function to avoid hardware operations. Unicorn is a great tool to emulate CPU, but is not very easy to implement serial ports.
fmt = uc.reg_read(UC_ARM_REG_R0);
bs = uc.mem_read(fmt, 0x100);
s = bs.decode('utf-8').split('\0')[0];
print(s) # only print the first arguments
uc.reg_write(UC_ARM_REG_PC, uc.reg_read(UC_ARM_REG_LR));
elif address == 0x10064d14: # This is at the begin of the second loop, print loop variable and total loop counter to show decrypt progress
n1=struct.unpack('I', uc.mem_read(uc.reg_read(UC_ARM_REG_SP)+0x18,4))[0]
n2=struct.unpack('I', uc.mem_read(uc.reg_read(UC_ARM_REG_SP)+0x28,4))[0]
print('go here', n1, n2);
# tracing all basic blocks with customized callback
mu.hook_add(UC_HOOK_BLOCK, hook_block) - Initialize registers and variables in the stack.
1
2
3
4
5
6
7mu.reg_write(UC_ARM_REG_R5, datalen ) # datalen is length of the encrpyted data
mu.reg_write(UC_ARM_REG_R4, 0x100abc80) # d = 0x100641d4+[0x10064f48]
mu.reg_write(UC_ARM_REG_R0, 0 ) #
mu.reg_write(UC_ARM_REG_SP, sp_ptr ) # set stack register
# set maxsize
mu.mem_write(sp_ptr+0x34, struct.pack('I', 0x800000)); # this variable should be greater than datalen;
mu.mem_write(sp_ptr+0x2c, struct.pack('I', data_ptr)); # data_ptr is the pointer to encrypted data; - Emulate
1
2
3
ADDRESS0 = 0x10064b00
ADDRESS1 = 0x10064f2c
mu.emu_start(ADDRESS0, ADDRESS1, count=-1) - Save decrypted dataPlease note: this script may take a long time to run. I tested it with my PC,(Intel(R) Core(TM) i5-9400 CPU @ 2.90GHz , 6 cores, 16GB DDR), and it took 15 minutes, so I printf loop variable at 0x10064d14.
1
open('rxnv.decrypted','wb').write(mu.mem_read(data_ptr, datalen)) # now, data_ptr points to the decrypted data
Now, we check decrypted rxnv.It’s a packaged Android kernel.1
2$ file rxnv.decrypted
rxnv.decrypted: Android bootimg, kernel (0x10008000), ramdisk (0x11000000), second stage (0x10f00000), page size: 2048
Analyse Kernel
I use binwalk to extract data from rxnv.decrypted
1 | $ binwalk -e rxnv.decrypted |
The -e flag will extract recognized data to floder _rxnv.decrypted.extracted;
Check extracted files:
1 | $ ls -l _rxnv.decrypted.extracted/ |
2DA000 is a cpio archive. Use the following commands to depack it;
1 | $ mkdir cpio.files |
ccImage should be the kernel binary.
Anslyse init script in Kernel
I checked the init file in the cpio archive. and it’s actually a bash script, and I found commands to mount rxte and user
1 | debug_msg "校验运行1" |
Recover true root file system
Run the same commands to mount rxte and user file, we can get actual rootfs.
1 | sudo cryptsetup luksOpen rxte rxsys -d _rxnv.decrypted.extracted/cpio.files/usr/lib/system.key |
Now we have hacked this board.
Conclusion
Finally, I hacked this board, The primary part is to decrypt rxnv using unicorn. We need not to rewrite instructions in C or Python. All we need to do is emulate the ARM instructions correctly.
Hacking pandroa's box game cartridge 1
http://mengxipeng1122.github.io/2023/01/04/hacking-pandroa-s-box-game-cartridge-1/