One of the challenges faced in Frida’s Gadget mode is an issue where the process you’re injecting into resumes immediately after injecting the JavaScript. This behavior prevents early instrumentation, which can be crucial for certain analysis tasks. In this blog post, I will guide you through a workaround to fix this issue.
When it comes to dynamic analysis and instrumentation of applications, Frida stands out as an indispensable tool in the kit of developers, reverse engineers, and security researchers alike. Its Gadget mode, in particular, offers unparalleled flexibility, allowing users to inject custom scripts into their target applications seamlessly. However, there’s a snag in the system that’s been tripping up professionals—early instrumentation.
Imagine setting up a meticulous script, ready to unravel the inner workings from the very inception of a process only to find that Frida has already allowed the application to resume before your instrumentation could catch the critical initial functions. This challenge has been particularly pronounced with the latest release, version 16.1.11, posing a significant obstacle to those needing to hook functions at the outset of program execution.
This blog post is forged from the need for a solution—crafted for persistence, it’s a beacon of hope for those grappling with this issue. Herein, we’ll walk through the intricacies of Frida’s Gadget mode and unveil a strategic approach to modify the resume_on_attach flag, a crucial step in gaining the control you require for early instrumentation. By the end of this guide, you’ll have mastered the method to hold the execution reins, ensuring your scripts are primed to hook at the starting line.
Join me as we delve into this technical deep-dive, transforming a point of frustration into a triumph of technical prowess.
Choosing Gadget Mode over Server Mode
In gernal, Frida provides 2 modes for injection, Sever mode and Dadget mode. I am debug an ARM32 program on an embedded patlform. And I tested, the server mode is not very reliable , may because the limit RAM on the dev board, and the dev board may reboot after I start frida-server, It’s very annonying, So I select Gadget mode,and reboot issue goes away. Frida offers two distinct modes for script injection: Server Mode and Gadget Mode. When working with ARM32 programs on embedded platforms, one must consider system constraints. My experience revealed that Server Mode could be unstable, potentially due to the limited RAM available on the development board. This instability often resulted in the board rebooting after initiating frida-server, which was disruptive to the debugging process.
Given these challenges, I opted for Gadget Mode. This alternative proved to be more stable under the same conditions, eliminating the frustrating reboot issues. Gadget Mode’s lightweight footprint makes it better suited for environments with resource limitations, thereby providing a more seamless and reliable debugging experience for ARM32 embedded systems.
The Solution: Modifying resume_on_attach
The root of this issue lies within the default behavior of Frida’s Gadget mode, which is controlled by the resume_on_attach field of the ControlChannel class. This field dictates whether the process should resume immediately after Frida attaches to it.
Step by Step Fix
Here’s a step-by-step guide to addressing this issue:
1. Modifying the ControlChannel Class
Locate the ControlChannel class definition within the frida-core/lib/gadget/gadget.vala file. Search for the resume_on_attach field and change its default value to false.
1
2
3
4
classControlChannel{ privatebool resume_on_attach = false; // Change from true to false // ... }
2. Compile Frida with Modified Code
After making this change, recompile Frida to incorporate the modification. Ensure you have all required dependencies and follow the standard build instructions provided in the Frida documentation. This github repository provides docker images for compiling Frida.
3. Using the Modified libGadget.so
Replace the original libGadget.so with the newly compiled version. With this change, the process will no longer resume immediately, allowing your JavaScript to hook functions at the very start of the execution.
4. Utilizing Python Script for Process Resumption in Frida Gadget Mode
While working in Frida Gadget mode, a common approach to inject a JavaScript payload into the target process would involve using the frida command from the Frida-tools package, like so:
1
frida -H <Board IP address> -n Gadget -l <Javascript file>
Executing this command initiates the injection, but it doesn’t automatically resume the process once the JavaScript file is loaded. Attempts to resume the process manually with %resume in the Frida REPL might not yield success.
To overcome this hurdle, I developed a Python script—a more reliable solution. The script not only injects the JavaScript code but also effectively resumes the process afterwards. Below is the functional part of the script where the device.resume(pid); command is used to resume the process:
# Python script to inject JavaScript and resume process in Frida Gadget mode import frida
# Establish a connection to the target device device = frida.get_device_manager().add_remote_device("<Board IP address>")
# Specify the target process identifier (replace 'pid' with the actual process ID) pid = 'pid'
# Path to the JavaScript file you want to inject js_file_path = "<Javascript file>"
# Read the JavaScript code from the file withopen(js_file_path, 'r') as file: js_code = file.read()
# Inject the JavaScript code into the process session = device.attach(pid) script = session.create_script(js_code)
# Load and execute the JavaScript code script.load()
# Resume the process to continue its execution with the injected code device.resume(pid)
print("JavaScript injected and process resumed.")
By employing this script, we ensure that the injection and process flow are controlled as expected, thus maintaining the stability of the debugging session.
Conclusion
This blog post addressed early instrumentation challenges in Frida’s Gadget mode and provided a solution by modifying the resume_on_attach flag. Gadget mode was recommended over Server mode for ARM32 programs on embedded platforms due to its stability. A Python script was introduced for injecting JavaScript and resuming the process, ensuring a controlled debugging session. Overall, this post offers a solution for fixing early instrumentation in Frida, empowering developers and researchers to gain insights into application behavior from the beginning.
This blog post aims to provide a method for accurately identifying the version of the NDK (Native Development Kit) used in a .so file within the Android platform.
Methodology
In certain situations, it becomes necessary to confirm the specific NDK version utilized in the .so files of an APK. Once achieve this, we can compile our own binary code using the same NDK version and subsequently patch the resulting binary into the .so files in order to accomplish our objectives. It is crucial to note that using a different version of the NDK may lead to ABI (Application Binary Interface) incompatibility issues with our binary.
Test Case: “Rise of Saiyan” Android Game
For the purpose of illustration, we will employ the Android game called “Rise of Saiyan.” You may download the game from the following link: Rise of Saiyan. Within this game, there exists a shared library file named libcocos2dlua.so.
Locating the Magic Word
The initial step involves finding the magic word, which in this case is “Android”. We can accomplish this by executing the following command:
By analyzing the hexdump, we successfully identified the NDK version string as r21e. This information allows us to download the corresponding NDK version.
Conclusion
In conclusion, this blog post presents a straightforward method for identifying the NDK version string within a .so file. By following the outlined steps, developers can accurately determine the NDK version and proceed with their required tasks effectively and efficiently.
Please note that the information provided in this blog post is intended for educational and informational purposes only. Any application of the techniques and tools mentioned in this post must be carried out responsibly and in accordance with local and international regulations and laws.
Attempting to hack software, including games, without express permission from the owners is strictly illegal and unethical. The author and the publishers of this blog do not condone, encourage or endorse any illegal activity, and any actions taken based on the contents of this blog will be solely at your own risk.
We strongly encourage readers to use this information to enhance their understanding of the underlying mechanisms of software and to promote improved security, rather than for ulterior purposes. This blog, its author, and its publishers bear no responsibility for misuse of the information provided.
Introduction
Hey there! Ever wondered how exciting it would be to peek under the hood of your favorite Android games, particularly the ones built using cocos2d? Well, this blog post will walk you through just that. But we’re not talking about cheats or shortcuts, we’re diving into game hacking — the good kind.
First off, why cocos2d? It’s a user-friendly, open-source software perfect for building games. On the other hand, Frida is a programmer’s secret weapon, akin to a multi-tool. It’s a powerful toolkit that allows you to weave your code seamlessly into an already-running process. This incredible ability to inject and inspect code in real-time, without causing a ruckus, makes Frida an essential instrument for any coder’s toolbelt.
Now, don’t worry if you aren’t a coding whiz. This guide is meant for anyone curious about how games work. A basic grip on the Android system, a touch of Typescript, a little bit of C++ and a whole lot of enthusiasm are all you need to level up. Ready for the ride? Let’s get started!
Create C++ module for hacking
To illustrate, I make use of a 2D game. This game adopts a unique format, defined by its developers, to house its animations. The asset files associated are denoted with a .ROM extension.
Each of these asset files can encompass multiple actions. In turn, each action is made up of several steps. Intriguingly, each step in this context represents an image. These images, which constitute the steps, might exhibit differing dimensions.
I plan on developing a C++ module that can be injected into the process for hacking. A detailed outline of this procedure can be found on my blog post.
Static analysis
Static analysis, also known as code review, is the process of examining source code without executing it, focusing instead on its structure, dependencies, and patterns. It is a widely accepted preliminary step in understanding the functionality of any software or application, including games built on frameworks like cocos2d.
Begin by familiarizing yourself with the cocos2d framework. Cocos2d is an open-source software development kit for developing games and other graphical applications. I can get cocos2d’s code from here: github.com/cocos2d/cocos2d-x.
Thoroughly reviewing the source code of the framework greatly benefits our endeavor to understand software in-depth, an essential step for ethical hacking. However, we should acknowledge that the openness of open-source platforms does present a double-edged sword. Despite its numerous advantages, it also opens a gateway for potential misuse. The exposure of the source code presents an intimate understanding of a software’s underlying mechanisms, which, while essential for improving and learning, can be exploited if it falls into the wrong hands.Reviewing the framework source code is very helpful for our hacking work. So I should say open source has its dark side. source code provides valuable insight into the underlying mechanisms of software.
Extracting information from binary
Typically, Android games developed using the Cocos2D framework incorporate a shared library known as libcocos2dcpp.so. This integral component houses the core logic underlying the game’s operations and interactions, serving as a centerpiece for the game’s design and execution. I plan to conduct a detailed examination of this file in order to glean more comprehensive insights about the underlying mechanics of this Android game. This in-depth analysis will allow me to understand its structure and functionality more precisely.
The result derived from executing the file command implies that the file is an ELF file, and is a ARM32 archtecture.
Ghidra
I utilized Ghidra for analyzing the shared library under examination. This comprehensive software reverse-engineering tool revealed that the library exports numerous symbols that can be invoked. A symbol that particularly caught our attention is _ZN7cocos2d14cocos2dVersionEv. This symbol is associated with a C++ function cocos2d::cocos2dVersion().
However, it’s important to note that the symbol name only provides information about the function’s namespace, name, and argument types. We can’t ascertain the return type solely from the symbol’s name. Fortunately though, we have access to the source code. By cross-referencing the function within the source code, I was able to determine that its return type is char*.
The following code illustrates the cocos2d version is cocos2d-x 3.3rc0
Once we precisely identify the version of the Cocos2d framework being used, it opens up the possibility to retrieve the exactly corresponding version of the source code.
Define C++ classes
In the process of extracting images from asset files, I lean on the capabilities of a particular C++ class called ActionGroupClass during the Ghidra analysis phase. This class not only streamlines the extraction process but also boasts of several utility methods. The following is the class define I infered from Ghidra
This class, ActionGroupClass, is designed and implemented by game developers, which means it isn’t found directly within the Cocos2D framework. Game developers have also defined several global variables, each of which is of the ActionGroupClass type. These variables are utilized throughout the game for various purposes, depending on the specific characteristics and methods defined within the ActionGroupClass. We can utilize these global variables to extract images from asset files. In addition, the shared library should contain code within the .init section. This code is responsible for calling the constructor method of the ActionGroupClass on these global variables. This initialization is essential in setting up the initial state for these global instances. In addition, modern C++ provides a way to call a constructor on an already allocated memory. This is called placement new. Here’s how it works: In C++, the new keyword typically allocates memory and then constructs an object in the allocated memory. However, there are times when you want to separate these two operations. For example, when you have already allocated memory and just want to construct an object at that memory location you can use “placement new”. Here is the general syntax:
1 2 3 4 5 6
#include<new> ...
auto* p = (unsignedchar*)&FishActionGroup; auto* fishActionGroup = new((void*)p) ActionGroupClass();
We can use this way to call constructor method in these global variables.
Dynamic analysis
Dynamic analysis involves the live examination of a system while it’s operational. In terms of hacking a cocos2d Android game using the Frida toolkit, dynamic analysis enables us to inspect and alter the game while it’s being actively played. This can provide insights that are not available during static analysis—when the program or game is not running.
Read string for a pointer to std::string.
When dealing with the Android NDK, there are numerous elements involved when implementing the Standard Template Library (STL). Since I’m utilizing a recent version of the NDK, the conventional method of extracting a string from a std::string variable using std::string::c_str() is unfortunately not applicable. Hence, a different approach is needed. After a detailed analysis of the memory layout connected to a std::string variable within the process, I have developed the following function to accurately extract the required string.
The shared library has been configured with Run-Time Type Information (RTTI) enabled. This setup allows us to extract RTTI using a pointer referring to a class directly. To streamline this process, I have authored the subsequent function specifically tailored for this task.
1 2 3 4 5 6
#include<typeinfo> constchar* getInstanceTypeName(void* ptr){ void** p = *(void***)ptr; std::type_info& t =*(std::type_info*)p[-1]; return t.name(); }
Extract images from a asset file
Moving forward, let’s deftly invoke the inherent functions of our key class, ActionGroupClass, to systematically acquire all pertinent information concerning the graphic elements.
Here’s an illustrative breakdown of its operations:
The first segment is devoted to reading a ROM file, specifically ‘weapon1.rom’, and storing it into memory. The in-memory address of this acquired data is logged for debugging purposes.
Next, the vQuickLoad method of fishActionGroup, an instance of ActionGroupClass, is invoked. This quickly loads in the binary content from the ROM data into our action group. Meanwhile, the parameters ‘30’ represent the default size in pixels for each sprite in the action.
The memory allocated to ‘romdata’ is subsequently cleared using ‘free’ to prevent memory leaks, and its pointer is nullified for safety.
Thereafter, we acquire the total count of actions stored within our action group by calling the _totalActionCount function. For every action, two tasks are performed: Firstly, the total number of steps related to that action are gathered. Secondly, the base coordinates (x, y) for that action are obtained via vGetBaseXY.
Each step per action is scrutinized next. This includes determining its directional vector (stepx, stepy) and the picture index related to each step. Moreover, the texture associated with each step of the action is also retrieved.
Finally, this section delves into extracting comprehensive details about said texture: the dimensions (width and height in pixels) and the format. This information, alongside other relevant details, is logged for every step in every action.
This meticulous process guarantees a thorough understanding of the movements, graphical elements, sizes, and properties involved, which immensely aids in manipulating or changing game assets for your desired outcome as part of your game hacking initiative. After obtaining the pointers to Texture2D, it becomes possible to invoke the built-in functions within the class to save the graphic data to disk. However, elaborating on the specifics of this process falls outside the boundaries of this blog post. Therefore, we won’t delve into that here.
Conclusion
In this blog post, we explored the world of hacking Cocos2D Android games using Frida. We emphasized responsible and ethical use of the techniques and tools discussed. We covered static analysis, examining source code, and dynamic analysis for inspecting games while running. We discussed the extraction of images from asset files using the ActionGroupClass. Remember, unauthorized hacking is illegal and unethical. Use this knowledge responsibly to enhance your understanding of software and promote improved security. Happy exploring!
In the previous blog post, we discussed how to create a NDK project to interact with an Android game. In this follow-up article, we will delve deeper into the game’s internals by call fucntions in libmain.so.
Analyzing libmain.so
We have chosen a game for analysis because its libmain.so contains a multitude of interesting functions. To examine the symbols exported by the library, execute the following command:
1
readelf -sW libmain.so
In our case, the library exports over 36,000 symbols. In theory, we can call each exported symbol using C++. This presents an exciting opportunity for exploration.
Conducting Static and Dynamic Analysis of libmain.so
Before calling these functions from C++, it is essential to establish a goal. In our current scenario, our goal is relatively simple: we want to list all assets in the game, including their names and types. To accomplish this, we need to extract relevant class definitions from libmain.so. For static analysis, we will employ Ghidra, while Frida will assist us in adding hooks to key functions for inspecting the game’s internal state and memory data. Please note that this process is complex and time-consuming, but the results are well worth the effort. While we won’t delve into the entire analysis process in this blog, we will share the final results. The following are the classes we extracted for listing all assets in the game:
Note: These class definitions are highly dependent on the version of libmain.so used. The MD5 hash of the libmain.so file we worked with is e721395e3e327899a5a55ea4fb422a1c. Additionally, to ensure compatibility with a C compiler and facilitate analysis in Ghidra, I have utilized __cplusplus macros in the code. Ghidra supports C code, and by using these macros, we can import the code into Ghidra for easier analysis. This allows us to leverage Ghidra’s capabilities while working with the codebase.
The VuAsset class has a member variable, _name, of type std::string at offset 0x08, used to store the names of assets. In the ARM64 platform, a pointer occupies 8 bytes.
The VuAssetDB class contains a member variable of type std::map<std::string, std::vector<std::string>> at offset 0x40, used to store the names of assets. The key of this variable is of type std::string, storing asset type names, while the value is of type std::vector<std::string>, storing asset names of the same type. We will utilize this class to print all asset names and types in the game.
The VuAssetFactory class includes a member variable of type std::vector<std::string> at offset 0x38, used to store asset type names. We can utilize this member variable to print all asset type names. Additionally, this class has a member variable of type VuAssetDB* at offset 0x68 to store the pointer to VuAssetDB. Furthermore, it contains a member variable of type std::unordered_map<unsigned int, VuAsset*> at offset 0x78, used to store loaded assets. The key of this variable is of type unsigned int, representing the asset hash calculated by asset name, and the valueis of type VuAsset*, storing the asset pointer. Lastly, the class includes a static member variable of type VuAssetFactory* to store the global instance of VuAssetFactory. This class follows the singleton design pattern, allowing us to obtain the global VuAssetFactory instance using mpInterface.
Helper Function for Obtaining the Actual Class Name of VuAsset Children
Based on our analysis, we have observed that VuAsset acts as a base class for other asset-related classes. To simplify our tasks, we have implemented a helper function that allows us to retrieve the actual class names. Please find the code snippet below:
1 2 3 4 5 6
staticconst std::type_info& getTypeInfoOfInstance_ndk(void* p) { p = *(void**)p; p = ((void**)p)[-1]; return *(std::type_info*)p; }
Given that libgame.so is compiled with the RTTI (Run-Time Type Information) option, we can utilize the getTypeInfoOfInstance_ndk function to obtain the class information of instances. It’s important to note that we cannot directly use the typeid operator to retrieve runtime type information (RTTI) of an object. This is because libgame.so contains the RTTI information, and when we write our C++ code in libmousebot.so, the typeid operator will provide the RTTI information from libmousebot.so, which may lead to incorrect results. Since we don’t have visibility into how the derived classes of VuAsset are defined, the getTypeInfoOfInstance_ndk function helps us retrieve the accurate class information from libgame.so.
Print all assets names and types
Now, it’s time to rock! In this section, we will demonstrate how to print all asset names and types using functions provided by libgame.so. This will serve as a great starting point for exploring Frida’s capabilities and the powerful combination of Frida and C++.
Get global pointer to the instance of VuAssetFactory To begin, we need to obtain the global pointer to the instance of VuAssetFactory. This can be achieved with the following code snippet:
Get the instance of VuAssetDB Next, we retrieve the instance of VuAssetDB using the pointer obtained in the previous step. The code is as follows:
1
auto* pVuAssetDB = pVuAssetFactory->_vuAssetDB;
List all assets in VuAssetDB In this step, we iterate through all the assets in VuAssetDB and print their names and types. The code snippet below demonstrates this process:
1 2 3 4 5 6 7
for( auto it = pVuAssetDB->_assetNames.begin(); it != pVuAssetDB->_assetNames.end(); ++it){ auto& assetType = it->first; auto& names = it->second; for(auto it1=names.begin(); it1!=names.end(); ++it1){ LOG_INFOS(" %s : %s", assetType.c_str(), it1->c_str()); } }
Here, the LOG_INFOS macro is used to print the asset information, which internally calls the _frida_log function. The resulting output will be similar to the following:
List All Loaded Assets in the Game In this final step, we will list all the loaded assets in the game. Although VuAssetDB contains all the assets, it only provides basic information for each asset. During the game runtime, the actual asset data is loaded on demand. The code snippet below demonstrates how to iterate through the loaded assets and print their information:
In this code, we use the getTypeInfoOfInstance_ndk function to retrieve the actual class name of each asset instance. The resulting output will be similar to the following:
You can find the complete source code in the repository
Conclusion
Congratulations! This marks the end of our exploration series. In this final log, we have successfully printed all asset information in the game using the functions provided by libgame.so. This serves as a solid foundation for further exploration of Frida’s capabilities. The combination of Frida and C++ opens up a world of possibilities, allowing us toperform various interesting tasks. With the knowledge gained from this series, you can continue your journey of hacking and exploring the game.
Remember, Frida and C++ together are a powerful toolset that can enable us to accomplish a wide range of tasks. The ability to access and manipulate game assets opens up exciting possibilities for customization, analysis, and experimentation.
Happy hacking, and enjoy your adventures in the world of game exploration!
In the previous blog post, we discussed how to create a Frida Typescript project to interact with an Android game. In this follow-up article, we will delve deeper into the game’s internals by using the NDK (Native Development Kit) and explore the process of hacking Android games using Frida.
NDK Version enumeration
To begin, we need to identify the NDK version used to compile the game’s native library (libmain.so). Follow these steps: 1. Navigate to the game data directory on the Android device. The path may vary, but an example path is:
1
cd /data/app/com.vectorunit.mercury.googleplay-hN_B8AKQmUeVXiBbDZ2Vvg==/lib/arm64
Note: Replace com.vectorunit.mercury.googleplay-hN_B8AKQmUeVXiBbDZ2Vvg== with the actual game ID on your device. 2. In the game data directory, we can find a file libmain.so. Copy it to PC. 3. Extract strings from libmain.so using the following command:
1
strings -tx libmain.so
Look for the version strings and commit IDs in the command output. For example:
1 2 3
ad4dac Android (7714059, based on r416183c1) clang version 12.0.8 (https://android.googlesource.com/toolchain/llvm-project c935d99d7cf2016289302412d708641d52d2f7ee) ad4e4a Android (4691093 based on r316199) clang version 6.0.2 (https://android.googlesource.com/toolchain/clang 183abd29fc496f55536e7d904e0abae47888fc7f) (https://android.googlesource.com/toolchain/llvm 34361f192e41ed6e4e8f9aca80a4ea7e9856f327) (based on LLVM 6.0.2svn) ad4f52 Linker: LLD 12.0.8 (/buildbot/src/android/llvm-r416183/out/llvm-project/lld c935d99d7cf2016289302412d708641d52d2f7ee)
Perform a Google search using the version strings and commit IDs to determine the NDK version. In this example, I assume the game was compiled with NDK r17c. 4. Download the according NDK from here, and uncompress it to your PC.
NOTE: NDK r17c is an older version and may not work with newer versions of Linux. Refer this page for potential issues of to run clang++ on NDK r17c. The provided solution in that post can help resolve the issue.
Create helper function in Typescript for C++ code
Next, we will create two helper functions in Typescript that can be called from C++ code:
This file instructs NDK to build a shared library. I set LOCAL_ALLOW_UNDEFINED_SYMBOLS to true to avoid compiler to complain about undefined symbols for our defined helper functions. We implements the helper functions in Typescript. We have no library for compiler to link.
Create Application.mk file with the following content:
1 2
APP_PLATFORM=android-27 APP_ABI=arm64-v8a
To determine the Android API level of your device, use the following command:
1
adb shell getprop | grep api_level
To determine the CPU ABI, use the following command:
1
adb shell getporop ro.product.cpu.abi
Create Makefile file with the following content:
1 2 3 4 5 6 7 8 9 10 11
ifndef NDKPATH $(error NDKPATH not set) endif
all: build_android
build_android: ${NDKPATH}/ndk-build V=1
clean: ${NDKPATH}/ndk-build clean
This Makefile instructs the NDK to build the shared library, while enabling verbose mode with the V=1 flag. Make sure to export the NDKPATH environment variable with the path to your actual NDK installation. By running make, the shared library will be built, and you can find it in the libs/arm64-v8a/libmousebot.so directory.
Convert .so file to typescript module
Next, we’ll convert the generated .so file into a TypeScript module. To accomplish this, we have provided a Python script called so2ts.py, which you can find here. The script performs the following steps:
Parse the .so file using LIEF library
Generate a .ts file that loads the .so file manually:
Allocates memory for the .so file, and loads it into the allocated memory, set ting the permissions to rwx.
Applies hot patches to the .so file using the information from the relocation sectin.
In the code snippet above, soname represents the name of the original libmain.so file. Since the game process loads this .so file during boot, we pass soname to libmousebotinfo.load to enable our .so file to resolve symbols from this library. Additionally, we pass _frida_log and _frida_hexdump to libmousebotinfo.load to provide these two functions to our .so file.
Call test function
To call the test function in libmousebot.so, use the following TypeScript code:
1 2
const m = Process.getModuleByName(soname); newNativeFunction(lib.symbols.test, 'int', ['pointer'])(m.base);
In the code snippet above, we obtain the base address of libmain.so using Process.getModuleByName. Then, we invoke the test function in libmousebot.so using lib.symbols.test, where lib.symbols includes all the symbols exported by libmousebot.so.
Recompile index.ts and inject the Frida script
With all the necessary code prepared, we can recompile index.ts and inject the Frida script into the game process. Use the following command:
1
frida -U -l _agent.js -n 'MouseBot'
When executed, the console will display the following output:
1
2
3
4
5
################################################## Hello from C++ ! 0 1 2 3 4 5 6 7 8 9 A B C D E F 0123456789ABCDEF 7a26ace000 7f 45 4c 46 02 01 01 00 00 00 00 00 00 00 00 00 .ELF............ 7a26ace010 03 00 b7 00 01 00 00 00 d4 04 72 00 00 00 00 00 ..........r.....
Conclusion
In this tutorial, we have learned how to build a shared library using the Android NDK and call C++ functions from TypeScript. By leveraging Frida, we successfully integrated the functionalities of libmousebot.so with the existing libmain.so of the game process. This opens up possibilities for further exploration and utilization of Frida’s capabilities.
In the next blog post, we will delve deeper into Frida’s extensive feature set and explore how to call functions in libmain.so from our custom libmousebot.so.
Thank you for following along! If you have any further questions or need assistance, feel free to reach out.
The techniques and information presented in this serial of blogs are strictly for educational purposes. Unauthorized use of these techniques for illicit activities, including game hacking, is strictly prohibited. The author and publisher do not condone or support any form of illegal or unethical behavior. It is essential to respect the intellectual property rights of game developers and adhere to the terms of service. Any actions taken based on the knowledge gained from this blog are solely at the reader’s own risk, and the author and publisher are not liable for any misuse or legal consequences that may arise.
Introduction:
Mobile gaming has become a massive industry, and many players strive to gain an edge by tweaking or modifying Android games. One powerful tool for game hacking is Frida, an open-source dynamic instrumentation framework. In this serial of blogs, we will guide you through the process of creating a Frida project using TypeScript, enabling you to hack Android games and unlock new possibilities. I will put all source codes in here.
The Game for Testing:
For the purpose of testing and learning, we will use “MouseBot”, a popular and addictive runner game developed by Vector Unit. You can download the Android version of the game for free from the Play Store here. It’s free.
Prerequisites:
To follow along with this tutorial, you’ll need the following:
A basic understanding of TypeScript.
Node.js installed on your machine.
A rooed Android device or emulator.
Frida installed on your machine.
Test game , MouseBot, installed in your machine.
Step 1: Setting Up the Project
Create a new directory for your Frida project.
Open a terminal or command prompt and navigate to the project directory.
Create a file named package.json in the project directory. You can view its content from here.
Create a file named tsconfig.json in the project directory. You can view its content from here.
Install the Frida library for TypeScript and frida-compile by executing the following command, I have write these libraries in this package.json:
1
npm i
Step 2: Writing the Frida Script
Inside your project directory, create a new TypeScript file, index.ts:
Open the file in your preferred code editor. Write the Frida script to print Hello world to the console.
Compile the TypeScript file into JavaScript using the following command:
1
make
This command will create a file named _agent.js in the project directory.
Run the Frida script using the following command:
Setup your Android device, start frida-server. This page has detailed instructions for this step.
Launch MouseBot on your Android device or emulator.
Execute the following command to inject the Frida script into the game process:
1
frida -U -l _agent.js -n 'MouseBot'
If everything goes well, Frida will inject the script into the game process. and you will see Hello world in the console.
Conclusion:
In this blog, we explored the initial steps of creating a Frida project using TypeScript and injecting a basic Frida script into an Android game. We emphasized the importance of using this knowledge responsibly and for educational purposes only. In the next blog of this series, we will delve deeper into Frida’s capabilities and explore more advanced game hacking techniques. Stay tuned and happy hacking!
This blog is intended solely for educational purposes. Please refrain from using this information for malicious purposes.
Introduction
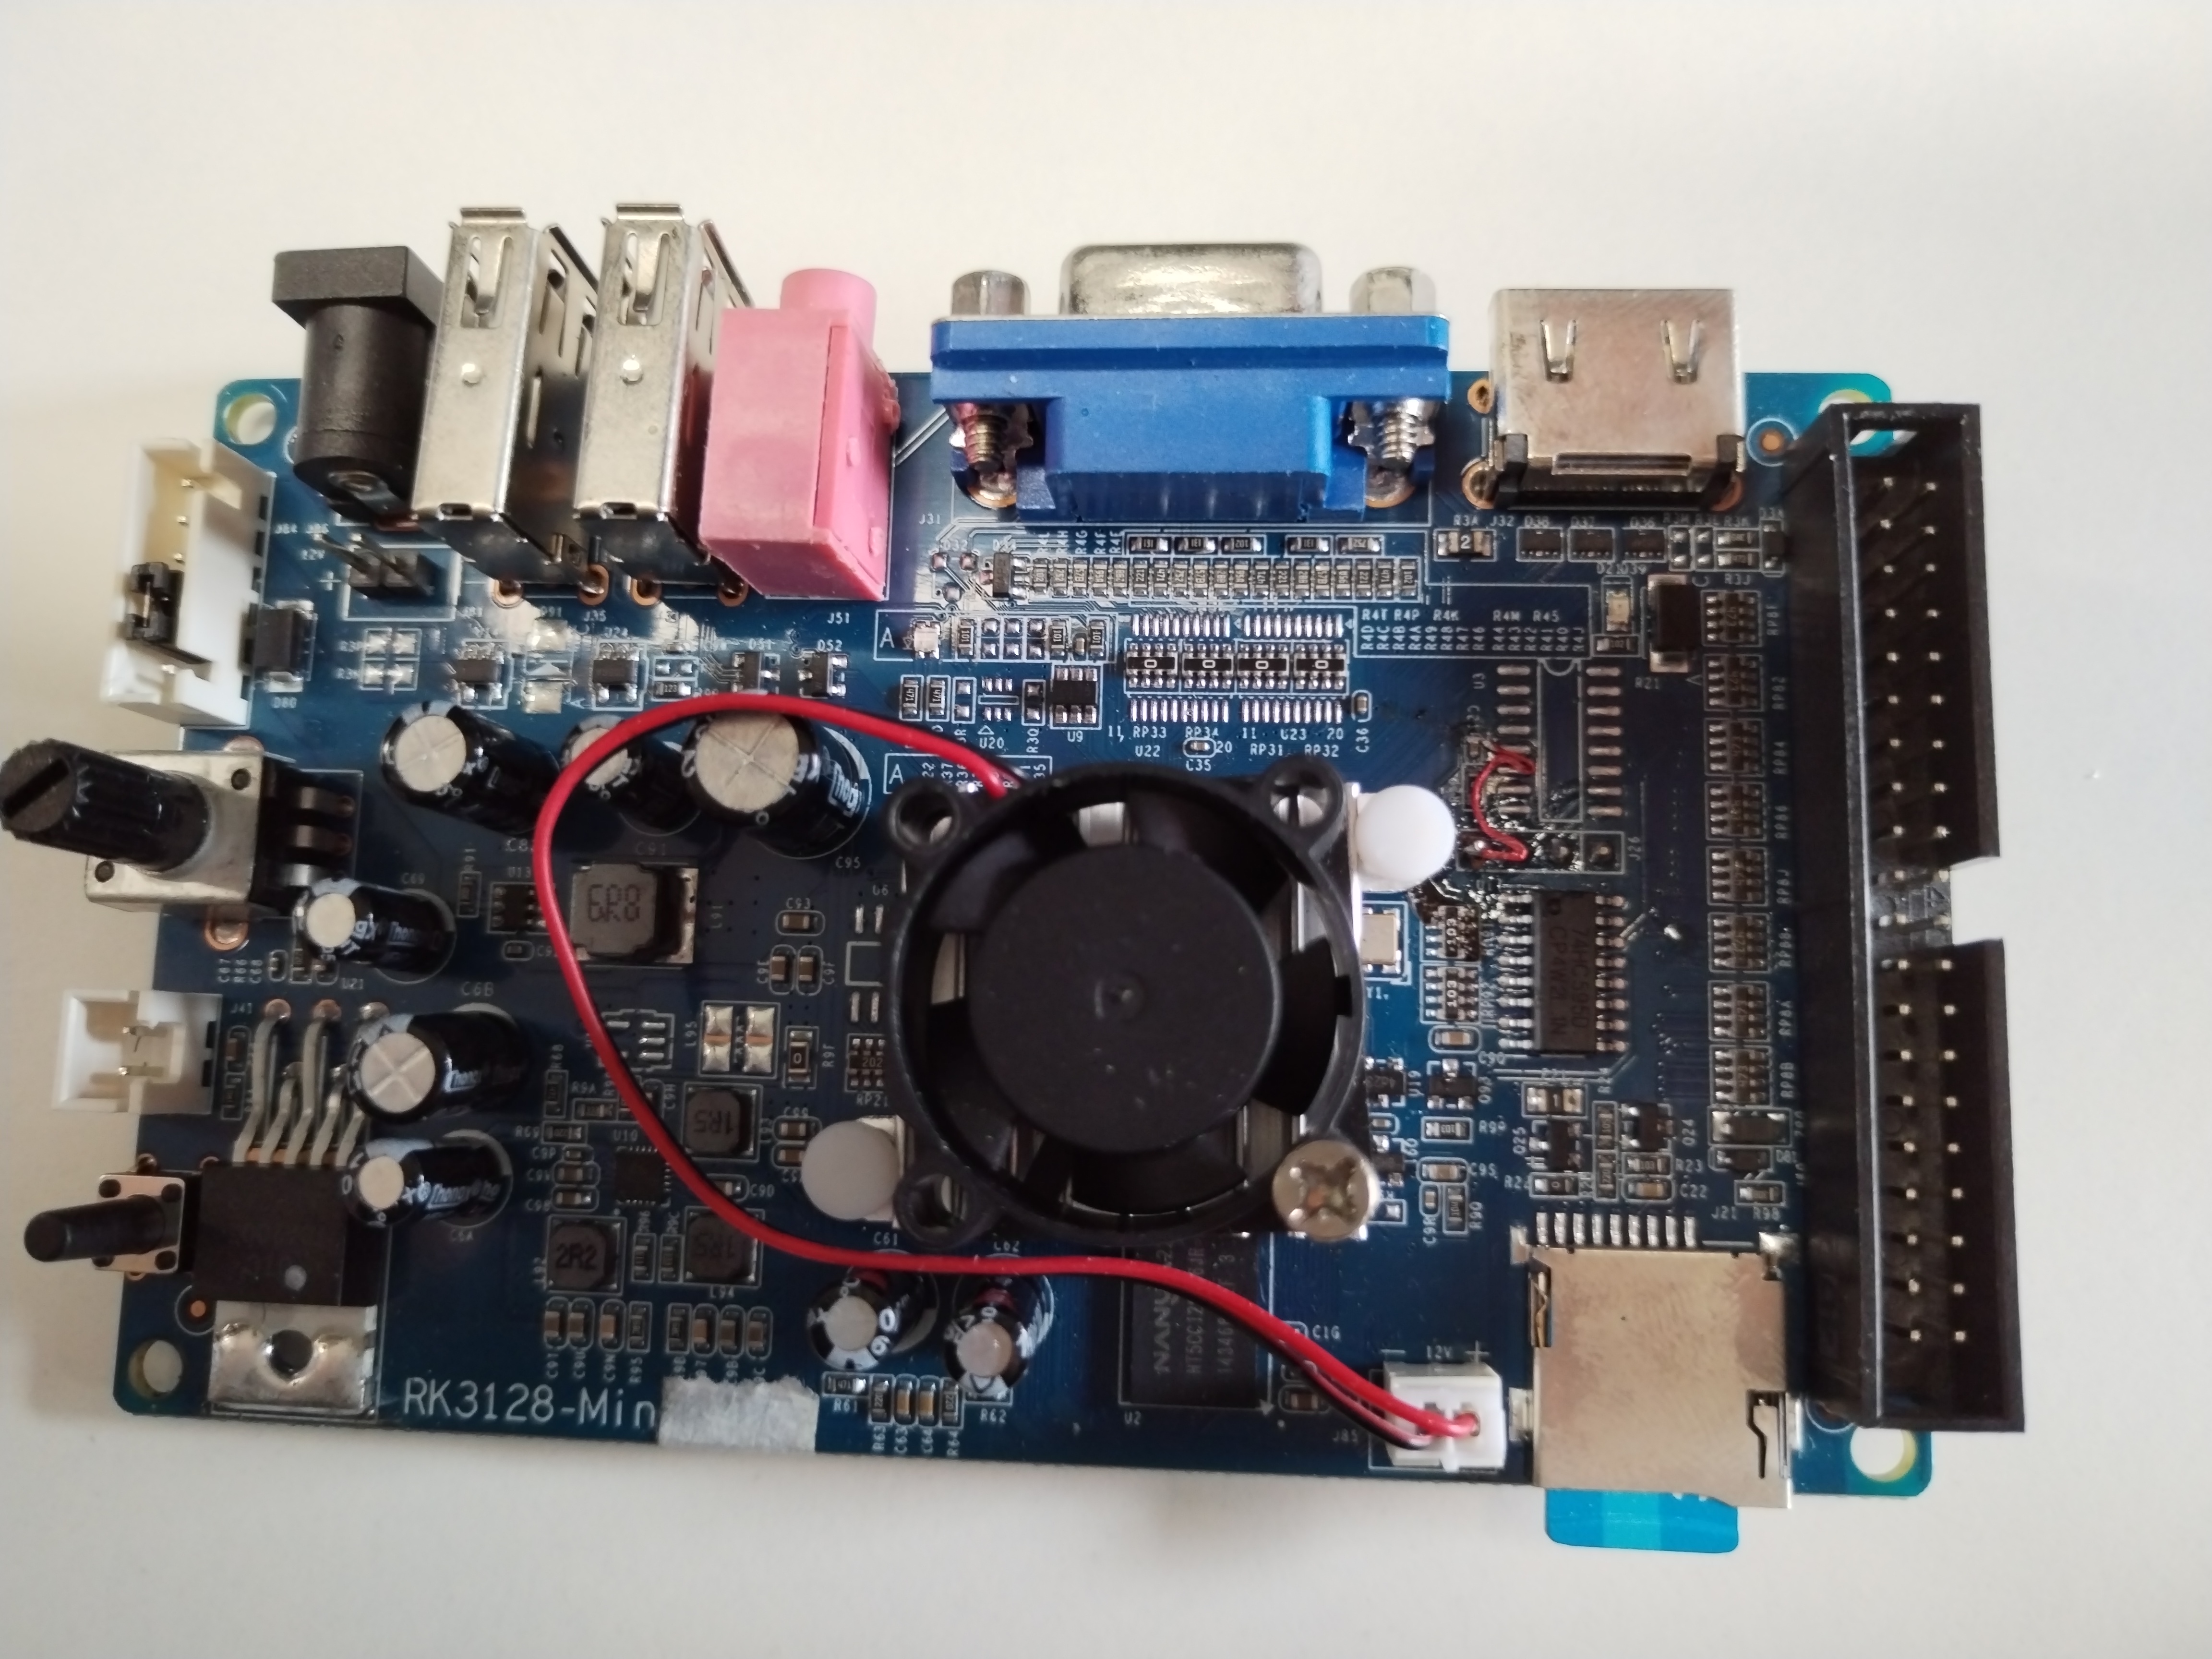
I recently acquired a new Pandora’s Box game cartridge, which utilizes the RK3128 system-on-a-chip (SOC) from Rockchip. I wanted to share my experience with hacking it. The manufacturer has overclocked it to 1.5GHz to ensure smooth gameplay with HD video filtering. However, due to the increased performance, an additional fan is required for cooling. Fortunately, the cartridge uses an SD card for booting, making it easy to dump the firmware.Here is a photo of the PCB:
loader
The system initiates the “loader” program to extract necessary files and launch the main program, “mkemu.” The manufacturer has placed the “loader” in the initram filesystem of the kernel, which is in CPIO format. Extracting the “loader” binary is a straightforward process. The following code snippet from /etc/init.d/rcS in the initram reveals how the system starts the “loader” program:
cd /lib/modules/3.4.39-h3 insmod elib.ko #insmod ch341.ko
whiletrue do /home/games/loader done
Analyzing the Loader Program
I loaded the “loader” program into Ghidra and performed an automated analysis. At address 0x11b10, it becomes evident that the “loader” attempts to mount a LUKS filesystem file:
The LUKS key is stored in ASCII format at address DAT_00028c94 and is calculated using a number read from /dev/elib. The function at 0x14720 includes the code to read the original number from /dev/elib:
Fortunately, the programmer compiled the Linux driver into an individual .ko file instead of including it in the kernel binary. This allows us to easily locate the code responsible for returning the number within the small .ko file.
Analyzing elib.ko
We can find elib.ko in the CPIO filesystem. By loading it into Ghidra, we can locate the code that handles the 0x80045a13 ioctl code in the elib_ioctl function. Ghidra’s decompiled C code provides the following information:
And the programmer is lazy, as he hardcoded this sensitive number. It’s 0x87654321. I noticed there is an MCU on the PCB, and I suspected the programmer might have stored the number in the MCU, but he didn’t.
Find the key for the LUKS file
Now, it’s time to calculate the key for the LUKS file. I decided to use unicorn engine for this task, I wrote a python script for this task. This script requires the preparation of the file rocky.rsa and the number 0x87654321. The thumb instructions call the standard libc functions, memset and memcpy. I simulate these two functions in the block_hook section. The following is the code:
If the script succeeds, we can get the LUKS key at address 0x28c94. It is a string, and we can use this key to mount the LUKS file on a PC.
Decrypt config.dat file
The function at 0x011dc8 is a decryption function. loader uses it to decrypt config.dat and other configuration files for gaming. I wrote a Python script to perform this decryption. The script saves the resulting file to /tmp/tt.bin.
mkemu
loader starts mkemu using system. We can find the related instruction at address 0x01153c in loader. The Ghidra decompiled C code is as follows:
mkemu is the essential program for this game cartridge. It displays the game selection menu and allows users to play their selected game. After analyzing it using Ghidra, I believe it utilizes SDL.
Decrypt asset
The programmer encrypted and packaged the assets in the file asset.dat. Therefore, we need to decrypt the assets using the Thumb instructions in mkemu. You can find the complete Python script in here. This script will save each decrypted asset file in the target folder.
Conclusion
This board isn’t very difficult, and I feel like hacking it is similar to participating in a Capture The Flag (CTF) competition. Every key is like a flag. The only difference is that the board is real.
This blog is only for educational purposes. Never use these info for bad.
Introduction
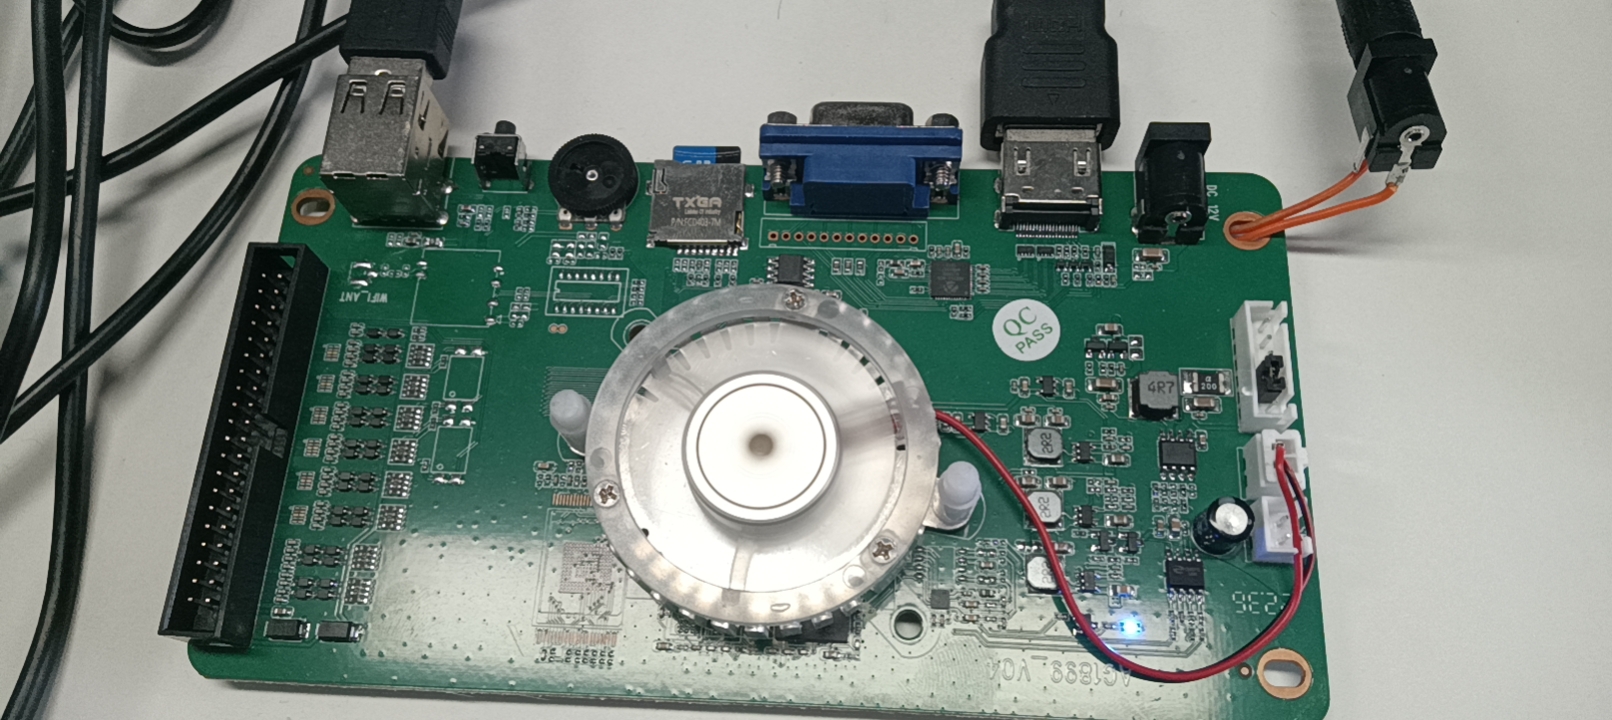
Pandora’s box multi-game cartridge is a popular product from China. This cartridge usually has 1000+ retro arcade games. It supports Jamma and HDMI. Users can enjoy old-time games with it. And some newer versions of it have more than 10,000 games, and support some home console games. Many manufactures from China have the ability to design and product Pandora’s box multi-game cartridge. They always add software protection to prevent others from cloning their efforts. Recently, I got a newer version of PB boards. And I hacked it. I will introduce the steps of how I hacked this board. The PCB is as follows: I uploaded all code to github
Tools/Packages I used
strings is a GNU util to output all printable strings in files.
binwalk is a easy way to extract firmware from an image file.
Ghidra is a great suite for disassembling and decompiling binary from variety platforms.
Unicorn is a lightweight multi-platform, multi-architecture CPU emulator framework.
Inspect image
This board uses Amlogic s805. This SOC is old, and not very powerful for running some 3D games. I think the manufaturer selected this SOC only beacause it’s cheap. This SOC only cost near to $1 if they select to use second-hard ICs. This board has s805, a memory IC, and no EMMC IC. It has a TF card of size 32GB, this board uses TF card boot mode. The TF card has 2 partitions, shown as the following:
UCL data compression library (v1.03, Jul 20 2004). Copyright (C) 1996-2004 Markus Franz Xaver Johannes Oberhumer http://www.oberhumer.com/opensource/ucl/
uclpack: block-size is 262144 bytes uclpack: decompressed 340268 into 740288 bytes
$ file uboot.bin.decompressed uboot.bin.decompressed: data
file can not recognize U-boot type. But strings can still give us some useful info.
1 2 3 4 5 6 7 8
$ strings -tx uboot.bin.decompressed <...> a9b72 switch_bootmode=iftest${reboot_mode} = factory_reset; then run recovery;elseiftest${reboot_mode} = update; then run update; elseiftest${reboot_mode} = usb_burning; then run usb_burning;elseiftest${wipe_data} = failed; thenecho wipe_data=${wipe_data}; run recovery;elsefi;fi;fi;fi a9c98 prepare=logo size ${outputmode}; video open; video clear; video dev open ${outputmode};if fatload mmc 0 0x13000000 logicalcircuit; then bmp display 0x13000000; bmp scale;fi; a9d46 storeboot=echo Rx Booting...; if unifykey get usid; then setenv bootargs ${bootargs} androidboot.serialno=${usid};fi;echo [Maple] read info...; if mmcinfo; thenif fatload mmc 0 ${loadaddr} rxnv; then setenv bootargs ${bootargs} bootfromsd; bootm;fi;fi; echo failed...; run recovery a9e62 recovery=echo enter recovery;if mmcinfo; thenif fatload mmc 0 ${loadaddr} recovery.img; then bootm;fi;fi; if usb start 0; thenif fatload usb 0 ${loadaddr} recovery.img; then bootm; fi;fi;if imgread kernel recovery ${loadaddr}; then bootm; elseecho no recovery in flash; fi; a9f77 usb_burning=update 1000 <...>
At 0xa9d46, storeboot environment variable shows U-boot load rxnv file using fatload command, and runs it using bootm. Now I can be sure rxnv actually is the kernel, and it should be encrypted. fatload should have code to decrypt it, or the kernel will not boot.
Locate decrypt codes in U-boot
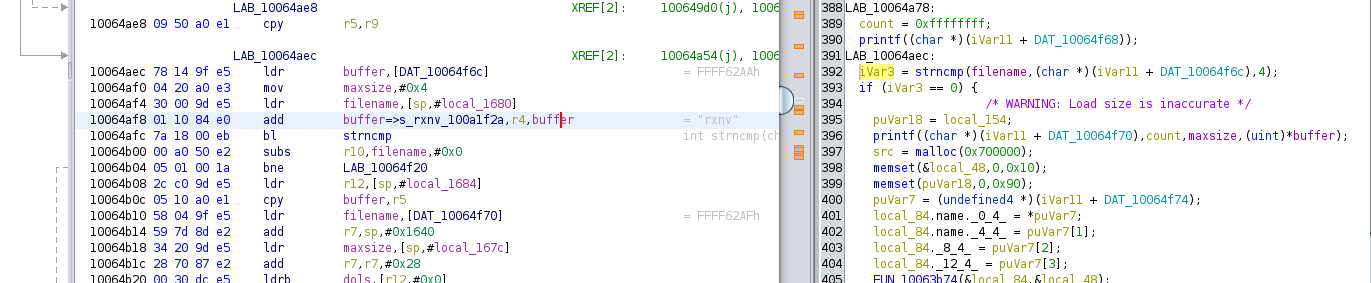
Now, open uboot.bin.decompressed with Ghidra. I can get U-boot will be loaded at 0x10000000 by check file build/u-boot.map in U-boot source code. That’s the funnest part during the whole hacking. Inspect disassemble code with source code. To make analysis easier, I wrote a header file uboot.h. This file includes some structure definitions. We can import this file into ghidra.After hours of efforts, I found the codes to decrpyt rxnv, it’s at 0x10064aec-0x10064f2c, shown as follows: . And these codes mainly do the following things:
Check the name of the file currently loading, if it is rxnv then decrytpt;
It seems to prepare key in the first loop;
Decrypt data in the sencode loop; And I found ghidra’s register renaming makes it not very easy to know the actual register name in every assembly instruction, just like instruction mov maxsize, #0x4 at 0x10064af0. We can use Patch Instruction menu item in the context menu to check the original instructions.
Decrypt data using code in U-boot
Let’s decrypt rxnv using the code we found. I worte a python script for this work. This python script uses unicorn to emulate ARM instructions in U-boot to decrypt rxnv file.
Create an ARM emulator
1
mu = Uc(UC_ARCH_ARM, UC_MODE_ARM)
Allocate memory
1 2 3 4 5 6 7 8
mu.mem_map(code_ptr, 0x10000000); # code_ptr= 0x10000000, I will put U-boot binary in here
mu.mem_map(data_ptr, 0x10000000); # data_ptr= 0x20000000, I will put encrypted data in here;
mu.mem_map(alloc_ptr, 0x10000000); # alloc_ptr= 0x30000000, this rangion if for malloc/free functions
mu.mem_map(0 , 0x00200000); # this is stack, and set sp_ptr = 0x00100000
Load data
1 2 3 4 5 6
# load uboot mu.mem_write(code_ptr, open('uboot.bin','rb').read()) # load data data = open('rxnv','rb').read(); datalen = len(data); mu.mem_write(data_ptr, data);
# callback for tracing basic blocks defhook_block(uc, address, size, user_data): if address == 0x10016248: # hook malloc, emulate malloc function, sz = uc.reg_read(UC_ARM_REG_R0); global alloc_ptr; ret = alloc_ptr; alloc_ptr+=sz; uc.reg_write(UC_ARM_REG_R0, ret); # write return value, a pointer to allocated memory uc.reg_write(UC_ARM_REG_PC, uc.reg_read(UC_ARM_REG_LR)); elif address == 0x10015fec: # hook free, do nothing uc.reg_write(UC_ARM_REG_PC, uc.reg_read(UC_ARM_REG_LR)); elif address == 0x10015bc8: # hook printf , actual printf function will access to serial port, so I emulate this function to avoid hardware operations. Unicorn is a great tool to emulate CPU, but is not very easy to implement serial ports. fmt = uc.reg_read(UC_ARM_REG_R0); bs = uc.mem_read(fmt, 0x100); s = bs.decode('utf-8').split('\0')[0]; print(s) # only print the first arguments uc.reg_write(UC_ARM_REG_PC, uc.reg_read(UC_ARM_REG_LR)); elif address == 0x10064d14: # This is at the begin of the second loop, print loop variable and total loop counter to show decrypt progress n1=struct.unpack('I', uc.mem_read(uc.reg_read(UC_ARM_REG_SP)+0x18,4))[0] n2=struct.unpack('I', uc.mem_read(uc.reg_read(UC_ARM_REG_SP)+0x28,4))[0] print('go here', n1, n2); # tracing all basic blocks with customized callback mu.hook_add(UC_HOOK_BLOCK, hook_block)
Initialize registers and variables in the stack.
1 2 3 4 5 6 7
mu.reg_write(UC_ARM_REG_R5, datalen ) # datalen is length of the encrpyted data mu.reg_write(UC_ARM_REG_R4, 0x100abc80) # d = 0x100641d4+[0x10064f48] mu.reg_write(UC_ARM_REG_R0, 0 ) # mu.reg_write(UC_ARM_REG_SP, sp_ptr ) # set stack register # set maxsize mu.mem_write(sp_ptr+0x34, struct.pack('I', 0x800000)); # this variable should be greater than datalen; mu.mem_write(sp_ptr+0x2c, struct.pack('I', data_ptr)); # data_ptr is the pointer to encrypted data;
open('rxnv.decrypted','wb').write(mu.mem_read(data_ptr, datalen)) # now, data_ptr points to the decrypted data
Please note: this script may take a long time to run. I tested it with my PC,(Intel(R) Core(TM) i5-9400 CPU @ 2.90GHz , 6 cores, 16GB DDR), and it took 15 minutes, so I printf loop variable at 0x10064d14. Now, we check decrypted rxnv.
Run the same commands to mount rxte and user file, we can get actual rootfs.
1 2 3 4
sudo cryptsetup luksOpen rxte rxsys -d _rxnv.decrypted.extracted/cpio.files/usr/lib/system.key sudo cryptsetup luksOpen user user -d _rxnv.decrypted.extracted/cpio.files/usr/lib/system.key sudo mount /dev/mapper/rxsys /mnt/disk -o "rw,loop" sudo mount /dev/mapper/user /mnt/disk1 -o "rw,loop"
Now we have hacked this board.
Conclusion
Finally, I hacked this board, The primary part is to decrypt rxnv using unicorn. We need not to rewrite instructions in C or Python. All we need to do is emulate the ARM instructions correctly.
This tutorial introduces how to use frida-mod. Frida-mod is trying to make us access functions more easily using Frida. We can call functions, hook and unhook functions. These functions can come from:
Existing modules, the process has loaded these modules after boot. I will call this is get mode.
Our modules, we can write these modules in C/C++, and it only supports 2 file formats. .so files and .dll files. I will call this is load mode.
Prepare C/C++ source codes.
get mode
For demonstraction, I wrote sprintf function prototype in file libc.h. For simplicity, we’d better make these source files not depend on other files.
load mode
In theory, we can use module source codes directly, but because we use llvm to parse source code for further process, this compiler may be different than the compiler you compile the actual module. So we may need to do some modifications on it.
Generate typescript wrapper code.
I wrote a python util to generate typescript wrapper code. It’s modinfo2ts.py. You can run modinfo2ts.py --help to get its help page.
get mode
1
./utils/modinfo2ts.py -m get -o modinfos/libc.ts source/libc.h
-m flag specifies mode, get mode is for the existing module; -o flag specifies the output typescript file name; the last argument is the source file, and it supports multiple source files;
-m flag specifies mode, load mode is for our own modules; -b flag specifies compiled module binary file; -o flag specifies the output typescript file name; the last argument is the source file, and it supports multiple source files, I use module source code here;
The generated code exports a mod variable.
Test generated typescript module
I wrote index.ts to test generated TS module. We need to import module as follows
1 2 3 4 5 6 7
import { mod as libcmodinfo } from'./modinfos/libc' import { mod as liblinux_x64info } from'./modinfos/liblinux_x64' import { mod as liblinux_x86info } from'./modinfos/liblinux_x86' import { mod as libarm64info } from'./modinfos/libarm64' import { mod as libarm32info } from'./modinfos/libarm32' import { mod as libwin64info } from'./modinfos/libwin64' import { mod as libwin32info } from'./modinfos/libwin32'
We need to use the alias to avoid the dupulcation of mod names.
Get mode
Function testLibcSprintf calls sprintf function in libc module.
1
2
3
4
5
6
7
8
9
10
11
// we need to specify the actual module name in here. // use the following code to get the module containing `sprintf` // let p = Module.getExportByName(null,'sprintf) // let m = Process.getModuleByAddress(p); // console.log(JSON.stringify(m)) let libc = libcmodinfo.get(modname); let buff = Memory.alloc(Process.pageSize); // use libc.functions.sprintf.call to call sprintf libc.functions.sprintf.call(buff, Memory.allocUtf8String("%s %d"), Memory.allocUtf8String('1 + 2 ='), ptr(1+2)); let resStr = buff.readUtf8String(); console.log('result', resStr);
Load mode
Function testLibAdd call add function implemented in our module
load module
I try to explain how to load the module on arm64 platform here. The passed parameters are slightly different on every platform.
1 2 3 4 5 6 7 8 9 10 11 12 13 14
let lib = libarm64info.load( [ // an array of depended libraries. load function will try to resolve symbols at these libraries.
], { // a map for symbols, the key is symbol name, the value is symbol address, // we can pass our defined frida NativeCall to the loaded module, // and we can set some never used symbols to null.
let a = 2;
let b = 3;
lib.functions.add.hook();   // hook add function
let res = lib.functions.add.call(a,b);   // call add function
lib.functions.add.unhook();   // unhook
console.log('res', res);
Conclusion
I introduced how to access functions in modules using frida-mod. Hope this util can help you write frida code easier.
This article introduces an inline hook library using Frida, and you can download all codes about this at this link. And I only implement it on ARM64 architecture.
Concepts
In my opinion, inlinehook just like put a breakpoint in debugger. Users can hook at any instructions, and executes any codes once the hook is triggered.
How to implement it
Basic steps
Put a jump code at the hook point, to jump to our trampoline code.
Trampoline code does the following:
Save current registers.
Invoke hook handler function.
Restore all registers.
Execute instructions at hook point.
Jump back to next instruction after the hook point.
Implementation using Frda
How to add hook
Before add inline hook, user should prepare the following things:
This function has two arguments, all are of type NativePointer. The first argument is named para1, and we can assign it when we add hook, the second argument is named sp, of value in the sp register, we can access values in the stack by this argument.
We can allocate a new memory for trampoline code. And because allocated memory is usually far from the hook point, so we have to use a long jump instruction at the hook point. Long jump instruction usually occupies more bytes. For using near jump instruction, we can try to find a cave near the hook point, and use the found cave to store trampoline code.
Warning: when we allocate memory, do not use a local variable for the returned pointer, use a global variable instead. Javascript’s garbage collection mechanism will free this memory automatically once the program is out of the local variable’s scope, and will crash the process.
We can pass a parameter to the hook handle function, and this parameter is of type NativePointer
Now invoke InlineHooker.inlineHookPatch to add a inline hook, just as follows
1
let sz = InlineHooker.inlineHookPatch(trampoline_ptr,hook_ptr, hook_fun_ptr, para1);
This function return a number, indicating the length of the trampoline code.
Code relocation
For inline hook, we need to move some instructions from one address to another. And we need to rewrite some instructions, just like B/BL instruction in ARM64 architecture. I am using the code in this link for rewriting instructions. I port the C code in this file to Typescript code. This file is my ported code. ARM64 instruction set is relatively easy, and Thumb/Arm32 is too complex, we may port its code in the future. This file exports this method to rewrite code
pc, the source address of current instruction This method also return a variable of type number, to indicate how many instructions has written to target address. We actually need to rewrite several instructions for one B instruction to avoid change its behavior.
Conclusion
I wrote an inline hook library using Frida. Inline Hooking is not very easy, specially in some architecture, I only implemented on ARM64, and will do more work on other architecture.
 .
.